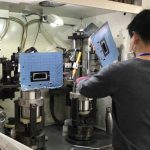
Many people may wonder how stainless steel insulated water bottles are able to keep drinks hot or cold for extended periods of time. To shed some light on this topic, let’s take a closer look at the manufacturing process of stainless steel vacuum insulated water bottles.
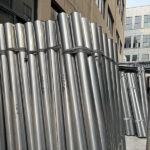
The primary raw material used in the manufacturing of these bottles is stainless steel, which is used for both the outer and inner shell of the bottle. The manufacturing process begins with the arrival of stainless steel pipes or sheets at the factory.
Here are the general steps involved in making a stainless steel vacuum insulated water bottle:
- The stainless steel is formed into two bottle shapes: one larger than the other. The larger shape becomes the outer bottle while the smaller shape becomes the inner bottle. There are two different methods used to form the stainless steel into a bottle shape: Explosive Hydroforming and Deep Drawing.
- In the Explosive Hydroforming process, stainless steel pipes are used as material. A pipe is cut to the appropriate length and a large amount of water is injected into the pipe, causing it to swell into a bottle shape under the pressure of the water. However, the bottle formed through this method does not have a bottom, so a round stainless steel plate is welded onto it to form a complete bottle.
- In the Deep Drawing Process, flat stainless steel sheets are used as material. The sheets are cut into round plates at the appropriate size and a punch press is used to stretch the stainless steel plate into a 3-dimentional bottle shape with a bottom. The inner and outer bottles can be formed using either of these two methods.
- Once the inner and outer bottles are formed, the inner bottle will be put inside the outer bottle, and the opening is chopped down to the correct size. Then a tool/machine is used to squeeze the opening of the bottles to a bottle neck.
- Welding: The inner and outer bottles are then welded together, creating a sealed chamber between the two layers, which will later become vacuum space that keeps the drinks in the bottle hot or cold.
- First temperature test: after the vacuum insulation is made, the bottles undergo a temperature test where hot air is blown into each bottle, and if the outside of the bottle stays cool, then the bottle is vacuum insulated. If the bottle becomes hot, there’s an issue with the vacuum insulation and the bottle is pulled from the line.
- Cleaning, Polishing & Applying Finishing: the bottles are then washed to remove lubricating oil and dust from the forming process and dried thoroughly. The exterior of the bottle is polished and cleaned, followed by a 2nd temperature test. The coated bottles are baked to dry the coating and designs and logos are printed onto the bottle using various techniques such as silk screening, heat transfer, water transfer, etc. Click here to see Packshine’s coating and printing options.
- Each bottle goes thorough quality inspection, including a 3rd temperature test, appearance inspection, and leakage tests, before being placed in an individual bag for assembly. The lid of the insulated water bottle is usually made from plastic and is injection molded. However, sometimes the bottle lid is made from plastic on the inside and wrapped in stainless steel on the outside. Packshine also offers an all-stainless steel lid option.
- The stainless steel bottles and lids are assembled, boxed, and packed in cartons for shipment.
By following this manufacturing process, Packshine ensures that their vacuum insulated water bottles are of high quality and will deliver without failure. If you have any questions regarding the manufacturing of stainless steel water bottles, feel free to reach out to us!